
DIY Vehicle Maintenance Tasks
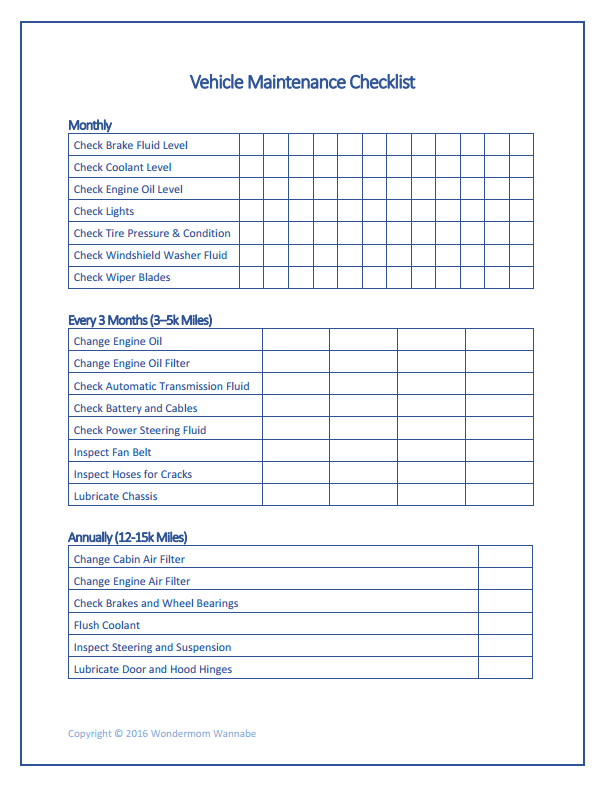
Taking control of your vehicle's upkeep doesn't require a professional mechanic or a hefty budget. For many car owners, mastering a few essential DIY maintenance tasks can save money, extend the life of their vehicle, and provide a deeper understanding of how their car operates.
From checking fluid levels to replacing air filters and changing a spare tire, these manageable skills empower you to handle routine wear and tear confidently. This article explores practical, accessible tasks that every driver can learn to keep their car running smoothly.
- Essential DIY Vehicle Maintenance Tasks Every Car Owner Should Know
- Comprehensive Guide to Essential DIY Vehicle Maintenance Tasks
- Key Factors to Consider When Applying the ,000 Rule to DIY Projects
- Assessing Vehicle Value Against the ,000 Threshold
- Managing Risk and Hidden Costs with the ,000 Rule
- Checking and Changing Your Engine Oil
- Inspecting and Replacing Air Filters
- Checking and Topping Off Fluids
- Frequently Asked Questions
Essential DIY Vehicle Maintenance Tasks Every Car Owner Should Know
How to Check and Change Your Engine Oil
Regularly checking and changing your engine oil is one of the most critical DIY tasks to ensure your engine runs smoothly. Start by parking your car on level ground and waiting for the engine to cool. Pull out the dipstick, wipe it clean, reinsert it, and then remove it again to check the oil level; it should be between the 'Min' and 'Max' marks.
If it's low, you can top it off with the correct weight of oil. When it's time for a full change, drain the old oil by removing the drain plug from the oil pan, replace the oil filter, and refill with the recommended amount of fresh oil. Always dispose of used oil properly at a recycling center.
Inspecting and Replacing Your Air Filter
A clean air filter is essential for good engine performance and fuel efficiency. You can easily inspect it by locating the air filter box under the hood (usually a black plastic housing with metal clips or screws).
Open the housing, remove the filter, and hold it up to the light; if light barely passes through or you see a lot of dirt and debris, it's time for a replacement. Simply purchase a new filter that matches your car's make and model, drop it in (making sure it fits snugly), and close the housing. Replacing a dirty air filter can often improve acceleration and increase your gas mileage.
How to Jump-Start a Dead Car Battery Safely
Knowing how to jump-start a battery is a skill that can save you from being stranded. First, ensure both cars are off and parked close enough for the jumper cables to reach. Connect the red clamp to the positive terminal (+) of the dead battery, then connect the other red clamp to the positive terminal of the good battery.
Next, attach the black clamp to the negative terminal (-) of the good battery, and finally attach the last black clamp to an unpainted metal surface on the dead car's engine block, away from the battery. Start the working car, let it run for a few minutes, then try starting your car. Remove the cables in reverse order once it starts.
| Task | Estimated Time | Tools Needed | Cost to DIY |
|---|---|---|---|
| Oil Change | 30-45 minutes | Wrench, oil filter wrench, drain pan, funnel | $25-$50 |
| Air Filter Replacement | 5-10 minutes | Screwdriver or pliers (if needed) | $10-$25 |
| Jump-Starting Battery | 10-15 minutes | Jumper cables or a portable jump starter | $0 (if you have cables) |
Comprehensive Guide to Essential DIY Vehicle Maintenance Tasks
How does the $3,000 rule apply when budgeting for DIY vehicle maintenance tasks?
The $3,000 rule in DIY vehicle maintenance budgeting is a guideline suggesting that if the estimated cost of repairing or maintaining a vehicle approaches or exceeds $3,000, it is often more financially prudent to consider replacing the vehicle rather than performing the work yourself. This threshold helps DIY enthusiasts weigh the value of their time, parts, and tools against the car's market worth.
You might be interested in this content. Engine Maintenance Tips for Beginners
For example, if a DIY transmission rebuild costs $2,800 in parts and specialty tools, but the car is only worth $4,000, the $3,000 rule advises evaluating whether the expense is justified versus buying a newer, more reliable vehicle. It also accounts for hidden costs like diagnostic errors or additional repairs that can push the total beyond initial estimates, ensuring your budget remains realistic and prevents overspending on an aging asset.
Key Factors to Consider When Applying the $3,000 Rule to DIY Projects
Estimating Total DIY Costs Beyond Parts
When applying the $3,000 rule, you must calculate the full scope of expenses, not just the price of replacement parts. This includes tools you might need to purchase or rent, such as a torque wrench or engine hoist, as well as fluids, gaskets, and disposable items like gloves or rags.
Additionally, factor in the cost of your own labor, though it is often undervalued in DIY budgeting; if a professional shop quotes $4,000 for a job, your $2,500 in parts might seem good, but consider the time spent and potential for mistakes that lead to extra costs. The rule helps you assess whether the total DIY investment stays under $3,000 to remain cost-effective compared to a used car purchase.
- List all required parts from the repair manual, including bolts, seals, and electronic components, and price them from multiple suppliers.
- Add costs for any specialized tools you do not already own, such as a clutch alignment tool or multimeter, including rental fees if applicable.
- Include consumables like brake fluid, coolant, and thread locker, as these small items can add up to hundreds of dollars.
Assessing Vehicle Value Against the $3,000 Threshold
Determining if Your Car Warrants the DIY Investment
The $3,000 rule requires you to objectively evaluate your vehicle's current market value before committing to a major DIY task. Use resources like Kelley Blue Book or local classifieds to find the car's worth in its current condition, considering mileage, rust, and overall reliability.
If the car is worth $2,500 and your DIY project costs $2,200, the rule suggests it may be better to sell the car as-is and put that money toward a more dependable vehicle. Conversely, if the car is a classic or has sentimental value, the rule can be adjusted, but generally, spending more than 80% of the car's value on repairs is economically questionable.
- Check your vehicle's trade-in value versus private-party sale price to get a realistic number for comparison.
- Subtract any existing problems that will not be fixed by the DIY project, such as rust or interior damage, from the car's value.
- Compare the total DIY cost to the cost of a comparable used car in good condition that meets your needs.
Planning for Unexpected Issues in DIY Maintenance
The $3,000 rule is also a risk management tool that accounts for common surprises during DIY work, such as seized bolts, broken components, or discovering additional wear that requires replacement. For instance, while replacing a water pump, you might find a leaking timing chain cover that adds another $500 in parts.
By keeping the total budget under $3,000, you have room to absorb these unexpected costs without derailing your finances. Always set aside a 20% contingency fund on top of your initial estimate to ensure you stay within the rule's limit, and pause the project if costs start to escalate beyond the threshold.
- Research common hidden issues for your specific make and model by reading forums and service bulletins before starting the work.
- Add a 20% buffer to your initial parts and tool estimate to cover unforeseen repairs like broken studs or degraded wiring.
- Plan to stop the project if the total projected cost exceeds $3,000 mid-way, and consider replacing the vehicle instead.
What basic car maintenance tasks can I perform myself at home?
There are several basic car maintenance tasks you can perform at home with common tools and a little know-how. These tasks help extend the life of your vehicle and save money on mechanic fees. Below is a detailed guide to get you started.
Checking and Changing Your Engine Oil
Understanding Oil Levels and Oil Changes
Engine oil lubricates moving parts, reduces friction, and helps cool the engine. Checking and changing it is one of the most critical and straightforward maintenance tasks. You will need a dipstick to check the level, and for a change, you will need new oil, an oil filter, a wrench, a drain pan, and a jack or ramps to lift the vehicle safely.
You might be interested in this content.
- Park your car on a level surface and let the engine cool down completely to avoid burns and ensure accurate readings.
- Locate the dipstick, pull it out, wipe it clean with a rag, reinsert it fully, then pull it out again to check the oil level against the marked indicators. Add oil if it is low.
- For an oil change, drain the old oil by removing the drain plug under the engine, replace the oil filter using an oil filter wrench, then refill with the manufacturer’s recommended oil type and quantity.
Inspecting and Replacing Air Filters
Maintaining Engine and Cabin Air Quality
Air filters prevent dirt and debris from entering the engine (engine air filter) or the passenger cabin (cabin air filter). A clogged filter reduces fuel efficiency, engine performance, or air quality inside the car. This task typically requires no tools or just a screwdriver, and the filters are usually accessible under the hood or behind the glove box.
- Open the hood and locate the engine air filter housing, usually a black plastic box near the engine. Unclip or unscrew the cover to access the filter.
- Remove the old filter and compare it visually with the new one. If it appears dirty, dusty, or clogged, replace it immediately. Most filters should be changed every 12,000 to 15,000 miles.
- For the cabin air filter, open the glove compartment, remove any stops or clips, and slide out the old filter. Insert the new filter with the correct airflow direction, then reassemble the glove box.
Checking and Topping Off Fluids
Managing Coolant, Brake Fluid, and Windshield Washer Fluid
Your car relies on several fluids beyond oil to operate safely and reliably. Regularly checking these levels prevents overheating, brake failure, and visibility issues. You only need a clean rag and the appropriate fluid types, which are available at any auto parts store.
- Coolant: With the engine cold, locate the coolant reservoir (usually translucent plastic near the radiator). Check the level against the “full” and “low” marks and add a 50/50 mix of coolant and distilled water if needed. Never open the radiator cap when hot.
- Brake fluid: Find the brake fluid reservoir, typically near the back of the engine bay. Wipe the cap clean before opening. The fluid should be between the minimum and maximum lines. If it is low, top it off with the specific fluid type recommended in your owner’s manual.
- Windshield washer fluid: Locate the washer fluid reservoir, often with a blue cap and a windshield icon. Fill it with premixed washer fluid until it reaches the top. Do not use plain water, especially in freezing temperatures.
Frequently Asked Questions
How Often Should I Check and Change My Engine Oil?
Check your engine oil level at least once a month, ideally before long trips. For oil changes, most modern vehicles require a change every 5,000 to 7,500 miles, though always consult your owner's manual for specific recommendations. Using the correct oil viscosity is crucial for engine health. Regular changes prevent sludge buildup, reduce friction, and extend engine life, making it one of the most vital DIY tasks.
What Is the Correct Way to Jump-Start a Dead Car Battery?
First, park both cars close enough so the jumper cables reach, but ensure they do not touch. Turn both vehicles off. Connect the red clamp to the dead battery's positive terminal, then the other red clamp to the good battery's positive.
Connect the black clamp to the good battery's negative, then the final black clamp to an unpainted metal surface on the dead car's engine block. Start the working car, wait a minute, then start the dead vehicle.
How Do I Properly Inflate My Tires at Home?
Check tire pressure when tires are cold for an accurate reading. Locate the recommended PSI on the driver's side door jamb or owner's manual. Use a reliable tire gauge and a portable air compressor.
Remove the valve cap, press the gauge firmly, and add air in short bursts. Recheck pressure frequently until it matches the recommendation. Underinflation reduces fuel economy, while overinflation causes uneven wear and a harsh ride.
When Should I Replace My Windshield Wiper Blades?
Replace your windshield wiper blades every six to twelve months, or immediately when you notice streaks, skipping, or squeaking. Harsh weather and UV exposure degrade the rubber.
To replace, lift the wiper arm, press the release tab or button, and slide the old blade off. Snap the new blade firmly into place until it clicks. Always test the new blades with windshield washer fluid. Regular replacement ensures clear visibility and safer driving during rain or snow.
You might be interested in this content.
Leave a Reply