
Brake Maintenance Tips
Your brakes are your vehicle's most critical safety system, yet they often go neglected until a problem arises. Regular maintenance not only extends the life of your brake components but also ensures your safety on the road.
From understanding warning signs like squealing or a spongy pedal to knowing when to replace pads and rotors, proactive care can prevent costly repairs and dangerous failures. This guide provides essential tips to keep your braking system in top condition, covering inspection routines, fluid checks, and best practices for longevity. Prioritize your brakes today for worry-free driving tomorrow.
Essential Brake Maintenance Tips for Optimal Vehicle Safety
Proper brake maintenance is crucial for ensuring your vehicle's safety and performance on the road. Regularly inspecting and servicing your brakes can prevent costly repairs and, more importantly, avoid dangerous accidents. Below are key areas where you should focus your attention to keep your braking system in top condition.
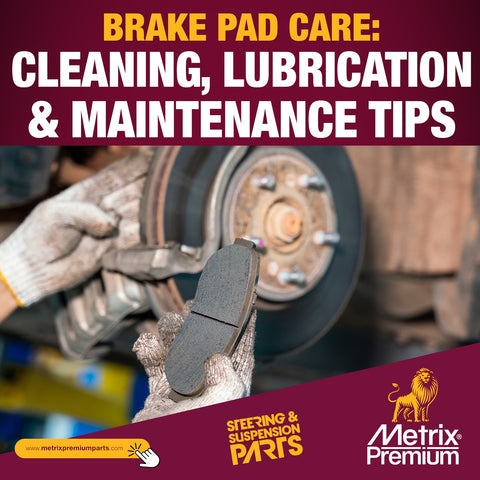
Regularly Inspect Brake Pads and Rotors
Your brake pads are designed to wear down over time, so checking their thickness regularly is vital. Most pads have a wear indicator that makes a squealing noise when they need replacement. Simultaneously, inspect the rotors for scoring, grooves, or warping. If you feel vibrations when braking, your rotors may be uneven, requiring resurfacing or replacement. Ignoring worn pads can damage the rotors, leading to much higher repair costs.
Check and Replace Brake Fluid as Recommended
Brake fluid is hygroscopic, meaning it absorbs moisture from the air over time, which lowers its boiling point and can lead to brake fade. Check the fluid level in the master cylinder reservoir and top it off if needed with the correct type specified in your owner’s manual. For best performance, flush and replace the brake fluid every two years or as recommended by your vehicle's manufacturer to maintain consistent braking pressure.
Listen for Unusual Noises and Feel for Changes
Pay close attention to how your brakes feel and sound. A high-pitched squealing often indicates worn brake pads, while a grinding noise suggests metal-on-metal contact, meaning pads are completely worn and rotors are likely damaged. If the brake pedal feels spongy or sinks to the floor, this could point to air in the brake lines or a fluid leak. Any sudden changes in braking performance should be addressed by a professional immediately.
You might be interested in this content. Battery Maintenance for Cold Weather
| Maintenance Task | Recommended Frequency | Key Indicators |
|---|---|---|
| Inspect brake pads | Every 6,000 miles or 6 months | Squealing noise, thickness below 3mm |
| Check brake fluid level | Monthly | Low fluid level, dark or dirty fluid |
| Flush brake fluid | Every 2 years or 30,000 miles | Moisture contamination, pedal feel changes |
| Inspect rotors | During pad replacement | Vibrations, grooves, or deep scoring |
Understanding the Core Principles of Brake Maintenance
Why Regular Brake Care is Critical for Vehicle Safety
Effective brake maintenance is not merely about replacing parts when they fail; it is a proactive approach that ensures the entire braking system operates reliably under all conditions. The braking system converts kinetic energy into heat through friction, which naturally wears down components over time.
Without regular attention, minor issues such as squeaking or reduced responsiveness can escalate into complete brake failure, leading to hazardous driving situations. A well-maintained brake system also preserves the integrity of other vehicle components, such as the wheel bearings and suspension, by ensuring balanced stopping power. Understanding these foundational principles helps drivers prioritize inspections and avoid costly repairs caused by neglected wear patterns, fluid contamination, or mechanical misalignment.
- Perform a visual inspection of brake pads and rotors every 5,000 miles to check for uneven wear or scoring.
- Monitor brake fluid levels and color; dark or cloudy fluid indicates contamination requiring immediate replacement.
- Listen for warning signs like grinding noises or vibration during braking, which signal metal-on-metal contact.
Step 1: Inspecting and Replacing Brake Pads
How to Assess Pad Thickness and Wear Patterns
Brake pads are the primary consumable component in the braking system, directly pressing against the rotors to create friction. To maintain effectiveness, you must measure the remaining pad material using a simple gauge or visual check. Most pads start with about 10-12 millimeters of friction material; once they wear down to 3 millimeters or less, replacement becomes urgent.
Uneven wear across the pad surface can indicate problems like stuck caliper pistons, warped rotors, or contamination from oil or brake fluid. Replacing pads in pairs (both front or both rear) is essential to maintain balanced braking force. Always use manufacturer-recommended pad compounds to ensure consistent performance and dust levels.
- Remove the wheel to access the caliper and visually measure pad thickness with a ruler or caliper.
- Inspect the pad backing plate; if it is visible or the pad is below 3mm, replace immediately.
- Clean the caliper slide pins and apply high-temperature grease before installing new pads to prevent sticking.
Step 2: Checking and Servicing Brake Rotors
Managing Rotor Thickness, Warping, and Surface Condition
Brake rotors work in tandem with the pads and must remain flat, smooth, and within manufacturer thickness specifications. Over time, rotors develop grooves from pad debris, become warped from excessive heat, or wear past the minimum thickness threshold, which reduces their ability to dissipate heat effectively.
A warped rotor often causes a pulsating brake pedal and vibration through the steering wheel. Resurfacing rotors on a lathe can restore a flat surface if sufficient material remains, but replacement is typically recommended for modern thin rotors to avoid future issues. Measure the rotor thickness at multiple points using a micrometer to confirm uniformity.
You might be interested in this content. How to Maintain Your Vehicle Year-Round
- Remove the rotor and measure thickness with a micrometer; compare to the minimum thickness stamped on the rotor.
- Check for visible cracks, deep grooves, or bluish discoloration from overheating that indicates structural damage.
- If replacing, always select rotors that match the vehicle weight and driving style, such as slotted for performance use.
Step 3: Flushing and Replacing Brake Fluid
Why Fluid Condition Directly Affects Stopping Power
Brake fluid is hygroscopic, meaning it absorbs moisture from the air over time, which lowers its boiling point and can cause vapor lock under hard braking. Contaminated fluid also corrodes internal components like master cylinder, calipers, and ABS valves.
A fluid flush every two years or 30,000 miles removes old fluid and moisture, restoring pedal feel and preventing internal damage. Use only the fluid type recommended in the owner manual (DOT 3, 4, or 5.1), as mixing types can degrade seals. Bleeding the brakes in the correct sequence (furthest to closest wheel) eliminates air pockets that cause a spongy pedal.
- Open the brake reservoir and use a turkey baster to remove old fluid without disturbing sediment.
- Attach a clear hose to the bleeder valve and have a helper pump the pedal while you open the valve to release fluid.
- Continue bleeding until fresh, clear fluid runs without bubbles, then top off the reservoir.
Frequently Asked Questions
How often should I replace my brake pads?
Brake pads should typically be replaced every 25,000 to 65,000 miles, depending on driving habits, vehicle type, and pad material. Inspect them regularly for wear indicators like squealing or reduced braking performance. If the pad thickness is less than ¼ inch, replace them immediately. Severe conditions like frequent stop-and-go traffic or heavy loads accelerate wear, so check every 10,000 miles for safety.
What signs indicate my brake rotors need attention?
Warning signs include pulsating brake pedal, vibration when braking, squeaking or grinding noises, and visible grooves or scoring on the rotor surface. If you notice a steering wheel shake during stops, rotors may be warped. Measure thickness with a micrometer; if below the manufacturer’s minimum, replace them. Resurfacing is an option for minor damage but replace if cracks or excessive wear are present.
Can I drive with worn brake fluid?
No, driving with contaminated or low brake fluid is dangerous because it reduces hydraulic pressure and can cause brake failure. Moisture in the fluid lowers its boiling point, leading to spongy pedal feel or vapor lock. Flush the brake fluid every two years or 30,000 miles to maintain performance. Check the level regularly; if it’s below the minimum line, inspect for leaks or pad wear.
How do I prevent brake calipers from sticking?
Prevent sticking calipers by regularly cleaning the brake area of dirt, debris, and road salt. Apply anti-seize compound to caliper slides and replace worn rubber boots to protect against moisture. Avoid harsh braking that generates excess heat, which can warp parts. If you notice uneven pad wear or a pulling sensation, lubricate the calipers or have a mechanic inspect them promptly for seizing.
You might be interested in this content.
Leave a Reply